Sunday 18 October 2015

Pattern Hack - turning the Pleatie dress or playsuit into a blouse


It's no secret I love the Pleatie Dress but with a kid who a) wont wear pants and b) won't wear anything elasticated around her belly I've had to hack it to a blouse to get the look I love but with a feel that suits her.


So of course you'll need your Pleatie Dress and Shortsuit pattern and all fabrics and notions according to the pattern. You'll need to alter the length of the top front and back pieces according to the table below. I like to taper my sides out on an angle very slightly to account for hips being larger than the waist.


{CUTTING}

Cut your top front and back pieces and facing pieces according to the options chosen using the revised length in the table above and collar and sleeves if you've chosen to use those. 

Prepare as per pattern steps 1-31

DO NOT DO STEP 32 - sewing down the placket... DON'T do this one yet - we will do it later in a slightly different method to the pattern to enclose the placket as there are no shorts or skirt attached to enclose it.

Continue from step 33-34

If using sleeves finish step 61-63


Overlock the bottom hem and fold it up the length of the overlocking and press (or just fold it up 1/4"), fold up another 1/4" and press - do not sew. 

Keeping the first 1/4" fold of the bottom hem folded up, turn the placket outward on the 3/4" pressed line you would have created in step 8 - so right sides are facing and the 1/2" fold of the placket is also folded up and tack this down at the second 1/4" pressed mark (along the fold you can see where my thumb is) repeat for other side. 
(a different view of what I've mentioned above)
Clip the corners of the placket and flip right sides out - poke out the edges  
Starting at the top of the left hand placket, sew down the placket till you reach the bottom hem, with your needle down, pivot and continue sewing along the hem line

Take care that your pleats lie flat when you are sewing over them.
Stop again at the right hand placket and with your needle down, pivot and sew up the placket till the top. You've basically sewn a big U shape.
Add your buttons or snaps and Tadah!!!! you've got a Pleatie Blouse


Friday 25 September 2015

Tadah!! It's a party dress!!


If you know me well, you know I don't do dresses! Well, till recently I didn't do them at all, then - DISNEY!! Ugh! They have totally managed to suck my kid in!! "Girls only wear dresses mummy" "no mummy, I want to be like a princess!!" *insert eye roll* 

Anyhooo, I digress....

You all know I'm a huge Tadah fan and love testing for Lauren. It's always relaxed, fun and easy. So it was a no brainer that I'd be testing for The Tea Party Dress

Firstly let me say OMG OPTIONS!! 4 different bodices, 4 different back styles, two arm heights, 3 sleeve options and two types of skirt.... I'm rubbish at math, so I'll let you do the math.... That's lots of different possibilities huh?? 

The best part of the dress? You top stitch your lining down while the dress is still flat and the back seams aren't done yet!! So much neater. The worst part? The procrastination that comes with choosing from the gazillion options available! Ha!! Spoiled for choice really! 

I made a few different neck lines but once I made the scoop back I was completely and totally in love!! #thatback *heart heart heart* 

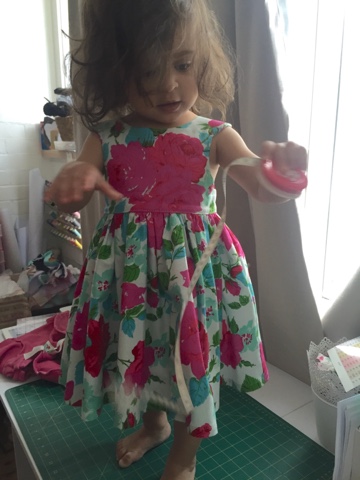
Dress: V neck, scoop back, high arm, straight skirt. 
A funny story about this dress - I didn't like it at all after I'd made it. Then she put it on and *sigh* 

When I posted some test fit pics in the test group someone mentioned it gave them beach/French vibes so I grabbed her felt hat and the camera and we ran down to the beach quickly to get the last of the light and I would have to say these are the best photos I've ever taken... Ever! 


Then I thought "oh, it'd be so cute to have a tea party shoot with both my girls" and this is about the best I got. 

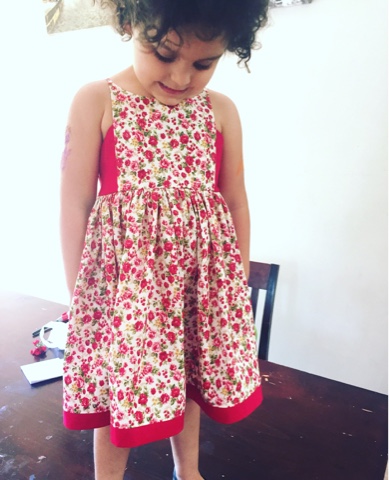
L: boat neck, high arm, scoop back, straight skirt. R: scoop neck, scoop back, high arm, straight skirt

Soon after this shot, the little one realised that delicious looking macaroon was not real and she proceeded to rip down the background and throw a massive tantrum! 
(Ps: that amazing handmade fabric tea set you can sort of spy there was made by the one and only ChookShed Designs)
"Wahhhhh how dare you try to fake me out with a toy macaroon wahhhhhh I want a real macaroon"

I did manage a few other shots in between the tears! 
Then the weather took a turn for the worse and I've only managed some cruddy fit pics of the rest of the test dresses I made. 

All up I've made 7 dresses with two more on their way as soon as I find the perfect coordinate. 

This has the boat neck, scoop back, mini cap sleeve, straight skirt. 

This is the boat neck, low arm, racer back, straight skirt. I could get through a pattern test without using some Cotton+Steel 
Another boat neck, mini cap sleeve, scoop back, straight skirt. This is one of the most precious fabrics I own by the way - very out of print Jennifer Paganelli Happyland 
Please excuse my unpainted wall, we've just finished this extension and have run out of time and funds to paint it haha 
But these are 6 of the dresses I've made 
I'll leave you with that, I'm off to finish off the hem on #7

Head over to the Tadah Patterns Facebook Group and check the pinned post for your discount code (next 48 hours)

Happy sewing 
T xx

Sunday 13 September 2015

Pattern Review - Hourglass Dress - RabbitRabbit Creations

I just knew when I saw the initial photos of this dress that I would have to have it!

And the tester photos didn't disappoint - in fact I think they were the most awesome tester photos I've ever seen.  

So I had to buy the pattern as soon as it was released and make one up the next night. 

I am utterly in love with this pattern, not only is the end result completely stunning but the construction is really clever too. 

The back bodice is attached by a method called 'tubing' which is also one of the methods used on the Elegance & Elephants Bohemian Babydoll Dress. 

The waist isn't enclosed, which I know many handmaidens prefer, Personally, I'm not really fussed on enclosing things - even when there is the option to do so, I very rarely actually do it - that's just a personal preference - I sew kids clothing, not haute couture. It's totally a personal preference though. 

I wouldn't call it a beginner sew because the instructions in the pattern are not really aimed at beginners. However, there is a Sewing Circle on Facebook with a video tutorial for every step!! So, I believe even a beginner could totally rock this pattern. 

As usual, my model wasn't really interested in taking photos but told me I could have 5 photos in return for 2 red snakes 😝


I think it's fair to say I love this pattern haha but more importantly, I truly believe you will too if you give it a go - totally satisfying to sew, a fabulous technique to learn and best of all you can feel proud that you've created something so unique and beautiful 

Try it for yourself!! You know you want to 
T xx

Wednesday 2 September 2015

Rapunzel, Rapunzel, let down your hair! Oh wait, my toddler has nohair!!

A couple of weeks after her real birthday we decided to have a party for our toddler at home so she could have all her little friends over (we celebrated her birthday in NZ) and the day before the party she insists that its a Princess Party and she needs to be Rapunzel *sigh*

So I threw together a last minute princes dress using the Amor Dress from Tadah Patterns, with some small modifications, of course!


I used the pleated sleeve option and I made the sleeves wider and gathered it instead of pleating, which gave it that cute 'sit on the shoulder' look and added a false placket to the middle with some sparkly ribbon. I also made the back elasticised instead of tie/button up. 

She's pretty happy with it and now has asked for a Belle dress too! I've given her a sticker behaviour chart to earn her Belle dress! 

Saturday 15 August 2015

Ruched Bloomers

My most popular post to date is the Flexi Shorts hack to make ruched bloomies! 


I know quite a few of you ladies have mentioned that you love the look, but you're reluctant to try it because shirring elastic gives you the heebie jeebies! 

So I thought I'd do a tutorial on how to get the same effect with 4 or 6mm elastic instead. 

I must admit, now that I've made a few this way, I actually prefer it. 

I'll go through the whole construction method again for the first timers, also Ive changed the elastic to start at the front instead of side seams.

I used the Flexi Shorts by Tadah Patterns to make these. I've been taking about 1" off the leg length to make it more bloomie style than shorts - you don't have to do this if you'd prefer them longer or regular and also I wouldn't recommend doing this for sizes smaller than a 1.

In addition to the requirements of the pattern you'll also need some 4 or 6mm elastic. 

Take your two front pieces, right sides together and sew from top to start of crotch, finish seam with your preferred method - press seam to left side. 


Lay your front piece down, right side up. Lay one back piece on top, right sides facing and match up the sides. Sew and finish with your preferred method. Repeat with other side and press side seams toward the back. You should end up with one long piece 


For flat front, cut a piece of medium or light weight interfacing to fit the front of your waistband x 1" wide and iron onto the front. 

Starting with your waist fold raw edge over 1/4", press and fold 1.25" and press well. Or, if you're lazy and don't really care about hiding seams, like me you could just overlock and fold over the 1.25" :) 

Fold cuffs over 1/4", press, fold 1/2" and press well. Again, you can just overlock and fold over 1/2"


Match back pieces, right sides together, unfold waist fold and leg cuffs folds and sew top to start of crotch and finish with your preferred method, press the seam to the right. Refold waist and cuffs and press them again. 


With your shorts inside out match the crotch seams together, unfold the leg cuffs and match the inner leg seams - sew and finish. Refold the cuffs and press. 

Sew the elastic casing on the cuffs, leaving a 2" gap to insert elastic later. 

Lay your shorts down, wrong side out, front facing up. Measure 3" in from the side seam on each of the front pieces and make a mark on the waistband 


Using that Mark as a guide, measure 1.25" down from the waist seam line and make a mark - this is where you will start your elastic from.


Draw a line down to the leg hem line 


FOR FLAT FRONT:

Optional: top stitch the top folded edge of your waist as close to the edge as possible (approx 1/8"). This is totally a personal choice!

Sew your elastic casing from the mark you made earlier on the waistband all the way to the other mark. 


This elastic table is the one I've been testing myself - I've not made ALL the sizes, so I suggest you don't cut your elastic to size till you've pinned it at the correct spots - if it looks too long or too short, then adjust accordingly. I've made a 0 right through to 5 and they're all ok so far.

Size
CM
Inches
000
28
11
00
28
11
0
28.5
11.25
1
29.2
11.5
2
30
11.75
3
30
11.75
4
31.5
12.25
5
31.75
12.5
6
33
13
7
33.6
13.25
8
33.6
13.25
9
34.3
13.5
10
35
13.75
11
35.5
14
12
35.5
14


Attach a safety pin to one end of your elastic. Insert your elastic into the casing - leaving a 1/2" tail of elastic toward the front of the shorts waist. 


Anchor down the elastic, go back and forth a few times to anchor the elastic down well. Remember to go slowly as this will be visible - I like to keep my needle down and pivot and follow the first line of sewing - repeat at least twice. 


Pull the pin through till the elastic at the other opening. Again leave a tail of 1/2" toward the front of the shorts, remove the safety pin and pin down from the outside to hold in place and sew down to anchor the elastic - again go up and down a couple of times to make the anchor strong. 


Set your needle in the last stitch of the elastic casing (left hand side of shorts) and sew down the front of the waistband. 


Grab your 4 or 6mm elastic and lay it down along the line you drew on the inside front of the shorts 

Cut the elastic at the top of the leg cuffs (where my thumb is) and then cut that piece in half to create one elastic length for each leg 


Pin down one tip of the elastic at the top marking you made earlier and the other tip of the elastic at the leg cuff. 

Stretch it out and find the apporximate mid point and pin there too. 

Set your needle in the elastic at the top pin and back stitch. 

Then stretch the elastic out to the middle pin and hold the waistband with one hand and the middle pin with the other 

Stop at the middle pin and keep your needle down. Remove the middle pin and stretch the elastic between the middle and leg cuff and sew down - back stitch at the end.

Repeat for the other leg. 

This is what it will look like from the inside 

Thread through your leg cuff elastic, sew closed the hole and you're done! 


Happy sewing and don't forget to post a pic of your creation in the Tadah Facebook Group 

Tanya xx