Tuesday 28 April 2015

It's never as hard as you think it's going to be


I've had the Tadah Patterns Peg Pants pattern since its release, it's one of the few patterns I wasn't a tester for! So, with winter coming I thought it would be time to make some... That, and I was playing swapsies with another handmade friend and the pegs were on her wanted list! 

To be perfectly honest, I hadn't tried them as they scared the crap out of me! They look super complex and very professional. 

For the first time ever I actually read though the pattern (OMG, I know!!) If you know me, you know I never read the pattern - just kinda dive in and check the pictures to make sure I'm on the right track. 

It's safe to say My first pair sucked!! My welt pockets are wonky and blergh, but I persevered and I've now made 4 in the last 5 days!!

These were the first

And to compare... My fourth pair's pocket 


My favourite part? Making the back fully adjustable!! And oddly enough I grew to love the welt pockets -- once I got them right haha

I made a pair for my little miss as well and she LOVES her 'plus pants' so much she wanted to wear them to bed last night ... So she did... Who's to argue with a 2.5 yo! 


And really, they're pretty darn cute! 

This super funky Cloud9 fabric, designed by the ever talented Rashida Coleman-Hale is totally my style! 
Next time it's kids clothing week I may even get organised enough to to participate!! 

T xx

PS: If you like the pattern, check out the Tadah Facebook Group (called Fresh Pattern Party) for great support and inspiration 

Monday 27 April 2015

Pattern Hack - making the Coachella shorts flat front

So, I posted a cute pic of my daughter wearing a pair of Striped Swallow's Coachella Shorts and allot of people were asking how to make it flat front, so I thought it might be a good start for my first blog

Firstly, you need the pattern > found here


The pattern uses a 3/8" seam but I'll be making them without a trim, so to make it easy for... well ... ME! I'm using a 1/4" seam on the hems. So keep that in mind if you want short shorts, maybe cut the length down from the size you want.


Ok, so cut out all your pieces as per the pattern and follow the steps on page 7 (sewing the crotch seams together) 


Overlock all the curved edges of the front and back and press well.


Starting with the back piece, fold over your overlocked hem - the overlocking will make a good guide to keep it even.

Sew the hem, going slowly and taking care with your corners


Repeat on both back leg pieces and the bottom hem only of the front pieces.  Press well.


Follow all steps on page 7 (sewing front to back)


On your front pieces, mark 2" in from the Center seam - this gives the shorts a more fitted look, you can use the pattern method instead if you prefer - then skip this step


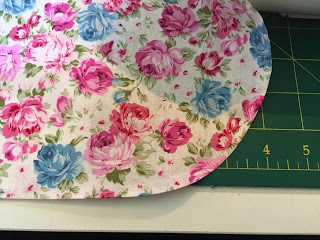
Fold the back piece over the front piece and match your mark with the seam line of the back, pin.


Make sure to lay it flat and pin again where the curves meet


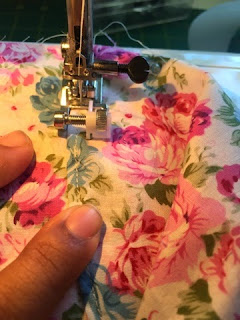
And sew along the original seam, following it closely

Till you get to the curve, stop here.


Repeat for the other side and you should end up with shorts that look a little like this


Follow the pattern for the waistband till you get to the part where you sew it on.


Mark the sides of your shorts and pin waistband to shorts.


Start sewing the front of the waistband 1" from side seam and stop 1" from next side seam and repeat for the back. You should end up with two gaps on the side seams, this is where we will insert the elastic later.


If you plan to do decorative topstitching on the top part of your waistband, now is a good time


 Cut your elastic. I've added a standard elastic table at the end of this tutorial - please bear in mind it is a guide only - if you feel your child needs more or less, please feel free to change it.


Insert your elastic and pull through, make sure you leave about 1/2" of elastic toward the front of the shorts and pin it securely so we can anchor it down later.


Thread elastic through to the other side seam and pull pin out. Leave about 1/2" of elastic toward the front of the shorts - pin down.


Turn the shorts inside out and close up the gap, repeat for the other side. Overlock or finish your edge.


Starting at the left front, anchor down the elastic by sewing in the ditch at the side seam


Fold down the waistband seam and top stitch it down (this is totally optional, if you don't like to top stitch -- then don't)


Continue to the right side seam and repeat the ditch stitch to anchor the elastic. Topstitch the back of the shorts.

And you're done!! WooooHOO!!


I'll post another blog about making shorts flat front when there is no waistband piece soon.

General elastic table for flat front:

000 – 7” / 17.75cm
00 – 7” / 17.75cm
0 – 7.25” / 18.5cm
1 – 7.5” / 19cm
2 – 7.75” / 20cm
3 – 7.75” / 20cm
4 – 8.25” / 21cm
5 – 8.5” / 22cm
6 – 9” / 23cm
7 – 9.25” / 24cm
8 – 9.25” / 24cm
9 – 9.5” / 24cm
10 – 9.75” / 24.75cm
11 - 10" / 25cm
12 - 10" / 25cm
I’ve used measurements from other flat front patterns I’ve used before, if you have one you prefer then use that ☺

Saturday 25 April 2015

Pattern Hack - Ruched Bloomies with a flat front


*i have updated this tutorial in a new post*

What you'll need: A shorts pattern - I use the Tadah Patterns Flexi Shorts. Cut the standard waist and leg option. 


Take your two front pieces, right sides together and sew from top to start of crotch, finish seam with your preferred method - press seam to left side. 


Lay your front piece down, right side up. Lay one back piece on top, right sides facing and match up the sides. Sew and finish with your preferred method. Repeat with other side and press side seams toward the back. 
You should end up with one long piece 


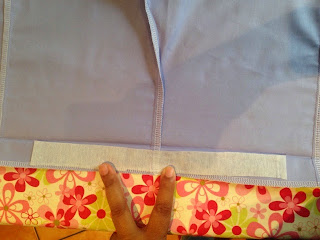
For flat front, cut a piece of medium or light weight interfacing to fit the front of your waistband x 1" wide and iron onto the front. 

Starting with your waist fold raw edge over 1/4", press and fold 1.25" and press well.
Fold cuffs over 1/4", press, fold 1/2" and press well.


Match back pieces, right sides together, unfold waist fold and leg cuffs folds and sew top to start of crotch and finish with your preferred method, press the seam to the right. Refold waist and cuffs and press them again. 


With your shorts inside out match the crotch seams together, unfold the leg cuffs and match the inner leg seams - sew and finish. Refold the cuffs and press. 

Sew the elastic casing on the cuffs, leaving a 2" gap to insert elastic later. 

TO MAKE RUCHED RONT:  
Lay your shorts down, right side out, front facing up. Mark the middle of your left and right legs. Measure 2” down from the waist seam line and draw a line down to the leg cuff hem.  


Now for the waist. If you don't want flat front then sew your waist casing, insert your elastic and close it up. 

FOR FLAT FRONT:

Optional: top stitch the folded edge of your waist as close to the edge as possible (approx 1/8"). This is totally a personal choice!

Sew your elastic casing from one side seam to the next. Attach a safety pin to one end of your elastic. 


Insert your elastic into the casing at one side seam - leaving a 1/2" tail of elastic toward the front of the shorts waist. 


            Anchor down the elastic by sewing in the ditch (side seam) go back and forth a few times to anchor the elastic down well. 


            Pull the pin through till the elastic at the other side seam. Again leave a tail of 1/2" toward the front of the shorts, remove the safety pin and pin down from the outside to hold in place and sew down the side seam to anchor the elastic - again go up and down a couple of times to make the anchor strong. 


Set your needle in the last stitch of the back elastic casing (left hand side of shorts) and sew down the front of the waistband your flat front shorts are done.


TO FINISH RUCHED FRONT:

I use shirring elastic but the same look could also be achieved by pinning a piece of thin elastic on the inside and sewing down from the outside but I find it doesn't always work out evenly for me... It could just be me :) 

Hand wind your shirring elastic onto your bobbin - firmly but not stretching it. 

Make sure you've got long tails of elastic and top thread. 

Put your machine on the highest tension and longest length stitch. 

On the right side of your shorts, sew down the line you drew earlier and end at the leg cuff hem line. Repeat for the other side. DO NOT BACKSTITCH 


Turn your shorts inside out and using a needle pull through the top thread on the start and end of each line of 'ruching'. Pull the shirring elastic a little to gather it a little bit more and then even out the gathers. Tie a couple of knots with the elastic and top thread that you've pulled through to secure them. Steam the shirring from the front. 

Press the shorts again and you're done!! Hooray!!


General elastic table for flat front:


Size
CM
Inches
000
17.75
7
00
17.75
7
0
18.5
7.25
1
19
7.5
2
20
7.75
3
20
7.75
4
21
8.25
5
22
8.5
6
23
9
7
24
9.25
8
24
9.25
9
24
9.5
10
24.75
9.75
11
25
10
12
25
10
I’ve used measurements from other flat front patterns I've used before, if you have one you prefer then use that ☺