
Firstly, you need the pattern > found here
The pattern uses a 3/8" seam but I'll be making them without a trim, so to make it easy for... well ... ME! I'm using a 1/4" seam on the hems. So keep that in mind if you want short shorts, maybe cut the length down from the size you want.
Ok, so cut out all your pieces as per the pattern and follow the steps on page 7 (sewing the crotch seams together)
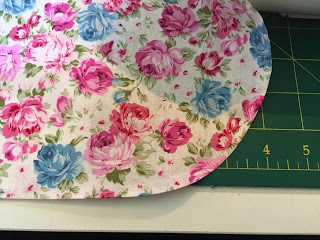
Overlock all the curved edges of the front and back and press well.


Starting with the back piece, fold over your overlocked hem - the overlocking will make a good guide to keep it even.
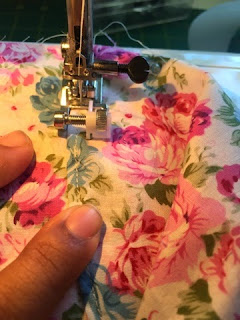
Sew the hem, going slowly and taking care with your corners

Repeat on both back leg pieces and the bottom hem only of the front pieces. Press well.
Follow all steps on page 7 (sewing front to back)

On your front pieces, mark 2" in from the Center seam - this gives the shorts a more fitted look, you can use the pattern method instead if you prefer - then skip this step

Fold the back piece over the front piece and match your mark with the seam line of the back, pin.

Make sure to lay it flat and pin again where the curves meet

And sew along the original seam, following it closely
Till you get to the curve, stop here.

Repeat for the other side and you should end up with shorts that look a little like this

Follow the pattern for the waistband till you get to the part where you sew it on.
Mark the sides of your shorts and pin waistband to shorts.

Start sewing the front of the waistband 1" from side seam and stop 1" from next side seam and repeat for the back. You should end up with two gaps on the side seams, this is where we will insert the elastic later.


If you plan to do decorative topstitching on the top part of your waistband, now is a good time

Cut your elastic. I've added a standard elastic table at the end of this tutorial - please bear in mind it is a guide only - if you feel your child needs more or less, please feel free to change it.
Insert your elastic and pull through, make sure you leave about 1/2" of elastic toward the front of the shorts and pin it securely so we can anchor it down later.

Thread elastic through to the other side seam and pull pin out. Leave about 1/2" of elastic toward the front of the shorts - pin down.


Turn the shorts inside out and close up the gap, repeat for the other side. Overlock or finish your edge.

Starting at the left front, anchor down the elastic by sewing in the ditch at the side seam

Fold down the waistband seam and top stitch it down (this is totally optional, if you don't like to top stitch -- then don't)

Continue to the right side seam and repeat the ditch stitch to anchor the elastic. Topstitch the back of the shorts.
And you're done!! WooooHOO!!

General elastic table for flat front:
000 – 7” / 17.75cm
00 – 7” / 17.75cm
0 – 7.25” / 18.5cm
1 – 7.5” / 19cm
2 – 7.75” / 20cm
3 – 7.75” / 20cm
4 – 8.25” / 21cm
5 – 8.5” / 22cm
6 – 9” / 23cm
7 – 9.25” / 24cm
8 – 9.25” / 24cm
9 – 9.5” / 24cm
10 – 9.75” / 24.75cm


Starting with the back piece, fold over your overlocked hem - the overlocking will make a good guide to keep it even.
Sew the hem, going slowly and taking care with your corners

Repeat on both back leg pieces and the bottom hem only of the front pieces. Press well.

Follow all steps on page 7 (sewing front to back)

On your front pieces, mark 2" in from the Center seam - this gives the shorts a more fitted look, you can use the pattern method instead if you prefer - then skip this step

Fold the back piece over the front piece and match your mark with the seam line of the back, pin.

Make sure to lay it flat and pin again where the curves meet

And sew along the original seam, following it closely

Till you get to the curve, stop here.

Repeat for the other side and you should end up with shorts that look a little like this

Follow the pattern for the waistband till you get to the part where you sew it on.
Mark the sides of your shorts and pin waistband to shorts.

Start sewing the front of the waistband 1" from side seam and stop 1" from next side seam and repeat for the back. You should end up with two gaps on the side seams, this is where we will insert the elastic later.


If you plan to do decorative topstitching on the top part of your waistband, now is a good time

Cut your elastic. I've added a standard elastic table at the end of this tutorial - please bear in mind it is a guide only - if you feel your child needs more or less, please feel free to change it.
Insert your elastic and pull through, make sure you leave about 1/2" of elastic toward the front of the shorts and pin it securely so we can anchor it down later.

Thread elastic through to the other side seam and pull pin out. Leave about 1/2" of elastic toward the front of the shorts - pin down.


Turn the shorts inside out and close up the gap, repeat for the other side. Overlock or finish your edge.

Starting at the left front, anchor down the elastic by sewing in the ditch at the side seam

Fold down the waistband seam and top stitch it down (this is totally optional, if you don't like to top stitch -- then don't)

Continue to the right side seam and repeat the ditch stitch to anchor the elastic. Topstitch the back of the shorts.
And you're done!! WooooHOO!!
I'll post another blog about making shorts flat front when there is no waistband piece soon.
General elastic table for flat front:
000 – 7” / 17.75cm
00 – 7” / 17.75cm
0 – 7.25” / 18.5cm
1 – 7.5” / 19cm
2 – 7.75” / 20cm
3 – 7.75” / 20cm
4 – 8.25” / 21cm
5 – 8.5” / 22cm
6 – 9” / 23cm
7 – 9.25” / 24cm
8 – 9.25” / 24cm
9 – 9.5” / 24cm
10 – 9.75” / 24.75cm
11 - 10" / 25cm
12 - 10" / 25cm
I’ve used measurements from other flat front patterns I’ve used before, if you have one you prefer then use that ☺
I’ve used measurements from other flat front patterns I’ve used before, if you have one you prefer then use that ☺
No comments:
Post a Comment