

*i have updated this tutorial in a new post*
What you'll need: A shorts pattern - I use the Tadah Patterns Flexi Shorts. Cut the standard waist and leg option.
Take your two front pieces, right sides together and sew from top to start of crotch, finish seam with your preferred method - press seam to left side.

Lay your front piece down, right side up. Lay one back piece on top, right sides facing and match up the sides. Sew and finish with your preferred method. Repeat with other side and press side seams toward the back.
You should end up with one long piece

For flat front, cut a piece of medium or light weight interfacing to fit the front of your waistband x 1" wide and iron onto the front.

Starting with your waist fold raw edge over 1/4", press and fold 1.25" and press well.
Fold cuffs over 1/4", press, fold 1/2" and press well.

Match back pieces, right sides together, unfold waist fold and leg cuffs folds and sew top to start of crotch and finish with your preferred method, press the seam to the right. Refold waist and cuffs and press them again.

With your shorts inside out match the crotch seams together, unfold the leg cuffs and match the inner leg seams - sew and finish. Refold the cuffs and press.

Sew the elastic casing on the cuffs, leaving a 2" gap to insert elastic later.
TO MAKE RUCHED RONT:
Lay your shorts down, right side out, front facing up. Mark the middle of your left and right legs. Measure 2” down from the waist seam line and draw a line down to the leg cuff hem.

Now for the waist. If you don't want flat front then sew your waist casing, insert your elastic and close it up.
FOR FLAT FRONT:
Optional: top stitch the folded edge of your waist as close to the edge as possible (approx 1/8"). This is totally a personal choice!
Sew your elastic casing from one side seam to the next. Attach a safety pin to one end of your elastic.


Insert your elastic into the casing at one side seam - leaving a 1/2" tail of elastic toward the front of the shorts waist.
Sew your elastic casing from one side seam to the next. Attach a safety pin to one end of your elastic.


Insert your elastic into the casing at one side seam - leaving a 1/2" tail of elastic toward the front of the shorts waist.

Anchor down the
elastic by sewing in the ditch (side seam) go back and forth a few times to
anchor the elastic down well.


Pull the pin
through till the elastic at the other side seam. Again leave a tail of
1/2" toward the front of the shorts, remove the safety pin and pin down
from the outside to hold in place and sew down the side seam to anchor the
elastic - again go up and down a couple of times to make the anchor
strong.

Set your needle in the last stitch of the back elastic casing (left hand side of shorts) and sew down the front of the waistband your flat front shorts are done.

TO FINISH RUCHED FRONT:
I use shirring elastic but the same look could also be achieved by pinning a piece of thin elastic on the inside and sewing down from the outside but I find it doesn't always work out evenly for me... It could just be me :)
Hand wind your shirring elastic onto your bobbin - firmly but not stretching it.
Make sure you've got long tails of elastic and top thread.
Put your machine on the highest tension and longest length stitch.
On the right side of your shorts, sew down the line you drew earlier and end at the leg cuff hem line. Repeat for the other side. DO NOT BACKSTITCH

Turn your shorts inside out and using a needle pull through the top thread on the start and end of each line of 'ruching'. Pull the shirring elastic a little to gather it a little bit more and then even out the gathers. Tie a couple of knots with the elastic and top thread that you've pulled through to secure them. Steam the shirring from the front.


Press the shorts again and you're done!! Hooray!!

General elastic table for flat front:
Size
|
CM
|
Inches
|
000
|
17.75
|
7
|
00
|
17.75
|
7
|
0
|
18.5
|
7.25
|
1
|
19
|
7.5
|
2
|
20
|
7.75
|
3
|
20
|
7.75
|
4
|
21
|
8.25
|
5
|
22
|
8.5
|
6
|
23
|
9
|
7
|
24
|
9.25
|
8
|
24
|
9.25
|
9
|
24
|
9.5
|
10
|
24.75
|
9.75
|
11
|
25
|
10
|
12
|
25
|
10
|
I’ve used measurements from other flat front patterns I've used before, if you have one you prefer then use that ☺
Thanks for the hacks, they are great! What shorts pattern did you use for this one?
ReplyDeleteThanks so much, I used the Tadah Patterns Flexie Shorts Joolz
DeleteThank you for this awesome hack! I've made a few and love them. I was wandering if you use the regular or high waist version of Flexi shorts? Regular looks funny so I'm assuming it is the high waisted version.....? Thanks again x
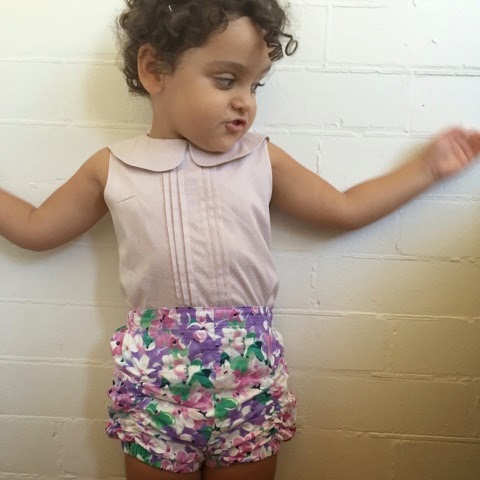
ReplyDeleteThank you for your kind words Melinda, I've used both regular and high waist. The first pic in the tutorial - the purple floral shorts my daughter is wearing - they're high waisted and the red ones at the end are standard waist.
ReplyDeleteThankyou for getting back to me.
DeleteAnytime :) I've just updated the method in a new blog post, so maybe try that one next time x
DeleteHi, just wondering if you have found the Flexi shorts pattern to be true to size? I've made a pair but they look so tiny!
ReplyDeleteI find them to be a bery narrow cut of shorts. In the bigger sizes, I have actually adjusted the pattern because I found that the crotch to waist length was very long. This made the pants appear to fit poorly at the front. I love this hack..but overall do not love the Flexi Shorts pattern (or many of Tadah's other patterns)
ReplyDeleteI find them to be a bery narrow cut of shorts. In the bigger sizes, I have actually adjusted the pattern because I found that the crotch to waist length was very long. This made the pants appear to fit poorly at the front. I love this hack..but overall do not love the Flexi Shorts pattern (or many of Tadah's other patterns)
ReplyDelete